


When you swap your motorcycle's incandescent turn signals for LEDs, the blinkers almost always start flashing too fast. That rapid flicker, usually called hyperflash, is the most common side effect of an LED signal conversion. In most cases the fix is one plug-in part: an electronic LED flasher relay.
This guide covers what the relay does, why LEDs cause the problem, how to tell whether you need a relay or a load equalizer, and which Custom LED relay is right for your bike.
What an electronic flasher relay does
The flasher relay is the small module that makes your turn signals switch on and off. On most bikes its core job is timing: it sets how fast the signals blink. When people say their relay went "bad" after an LED swap, what they almost always mean is that the blink rate is wrong, not that the relay failed.
One thing worth knowing up front: the part your bike calls a flasher relay is not always a simple flasher. Some motorcycles use a combination relay or signal control unit, with several wires and data circuits, that also manages functions like self-canceling turn signals, hazard flashing, and bulb monitoring. A basic two-wire electronic relay only handles the flashing, so replacing a combination unit with one can drop those extra functions. That is why we make connector-specific models such as the ELFR-1-U for bikes that use a multi-pin combination relay, and why a load equalizer is sometimes the better choice when you want to keep a factory self-canceling feature (more on that below).
An electronic LED flasher relay holds the blink rate at the normal, legal speed no matter how little power your LED signals draw. Federal law (FMVSS 108) requires turn signals to flash between 60 and 120 times per minute, and a properly matched relay keeps you in that window whether you are running LED bulbs, stock bulbs, or any combination of the two.
Why your stock relay cannot handle LEDs
Your factory flasher decides how fast to blink by watching how much current the turn signal circuit draws. Older bikes use a thermal flasher, where current heats a small metal element that opens and closes the circuit. Newer bikes use an electronic flasher that measures the load directly. Either way, the flasher is built around the assumption that a working bulb draws a certain amount of power.
LEDs are far more efficient, so they draw a tiny fraction of what an incandescent bulb does. The flasher reads that low current as a burned-out bulb and responds the way it was designed to: it doubles the blink rate to warn you (hyperflash), or in some cases it stops blinking entirely (the no-blink problem). Nothing is broken. The relay is doing its job with a load it was never built to see.
This is why a Custom LED electronic relay is specified for a very wide load range. Ours hold the normal rate across anything from 0.05A to 10A (roughly 0.6 to 120 watts), which covers nearly any mix of LED and stock bulbs you are likely to run.
What if my bike already came with LED turn signals?
It is easy to assume that a motorcycle that rolled off the line with LED turn signals is immune to all of this. Often it is not. The factory flasher on an LED-equipped bike is tuned for the exact OEM signals it shipped with, and it expects that specific electrical load. The moment you change the signals, that assumption breaks.
So if you replace the OEM LED signals with a different aftermarket set, add an integrated LED tail light, or run fewer or lower-draw LEDs than the bike came with, the factory relay can hyperflash, refuse to blink, or trip a bulb-out warning, just as it would on a bike converting from incandescent. The bike was already LED, but the relay was matched to the original load, not the new one.
The fix is the same as any other conversion: match the system to the new load. On most bikes that means one of our compatible electronic LED flasher relays, which holds the correct rate no matter how much current the signals draw. Where a plug-in relay is not available, a load equalizer sized to the OEM blinker lamps restores normal behavior.
How an electronic LED flasher relay fixes it
A timing-based electronic relay ignores current draw altogether. Instead of guessing at bulb health from how much power flows through it, it flashes on a fixed internal timer at the correct DOT rate. Run two LEDs, four LEDs, or a mix of LED and incandescent, and the rate stays normal.
Because the Custom LED relays plug into the factory connector, installation on a supported bike is genuinely plug-and-play: unplug the OEM relay, plug ours in, done. They also turn on with near zero delay, so your first blink fires the instant you hit the switch rather than after the lag some other LED relays have.
Flasher relay or load equalizer: which do you need?
There are two ways to fix a fast blink. You can replace the flasher relay, or you can add a load equalizer, which is a resistor that mimics the electrical power draw of the original bulb so the stock relay behaves normally. Replacing the relay is almost always the better and cheaper solution, but a load equalizer is the right answer in a few specific cases.
Choose a flasher relay when:
- A compatible plug-in relay exists for your motorcycle (check the finder below).
- You want the cleanest, lowest-cost fix with no splicing.
- You want to keep the power-saving benefit of running LEDs.
Choose a load equalizer when:
- Your bike's flasher function is built into another module or a combination unit that cannot be swapped on its own, and no plug-in relay fits.
- You need to preserve a factory self-canceling turn signal feature. Replacing the relay can disable self-cancel, so our Load Equalizers are the better choice if you want to keep it.
- You are working on a vehicle that shares one circuit for brake and turn signals.
Custom LED Load Equalizers fix the fast-blink, no-blink and 4-way blink problems, and they come in 2 Watt, 10 Watt and 25 Watt sizes so you can match the wattage of the bulb you removed. For the full breakdown of how equalizers work and how to size them, see our guide to LED Load Equalizers.
The Custom LED flasher relay lineup
We make several versions of our Electronic LED Flasher Relay so you can plug directly into your bike's factory connector. They share the same core electronics. The difference is the connector and a few features.

ELFR-1 is the standard plug-and-play relay and the one most riders need. It plugs into compatible 2-wire and 3-wire OEM flasher relay connectors, where the third wire is simply a ground that our relay does not require. It is the recommended relay for every Custom LED Integrated LED Tail Light.

ELFR-1-QD uses the same electronics as the ELFR-1 but ships with male quick-disconnect terminals instead of a molded connector. It is the right pick for certain OEM connectors and for custom or hard-wire installs where you want to attach your own terminals.
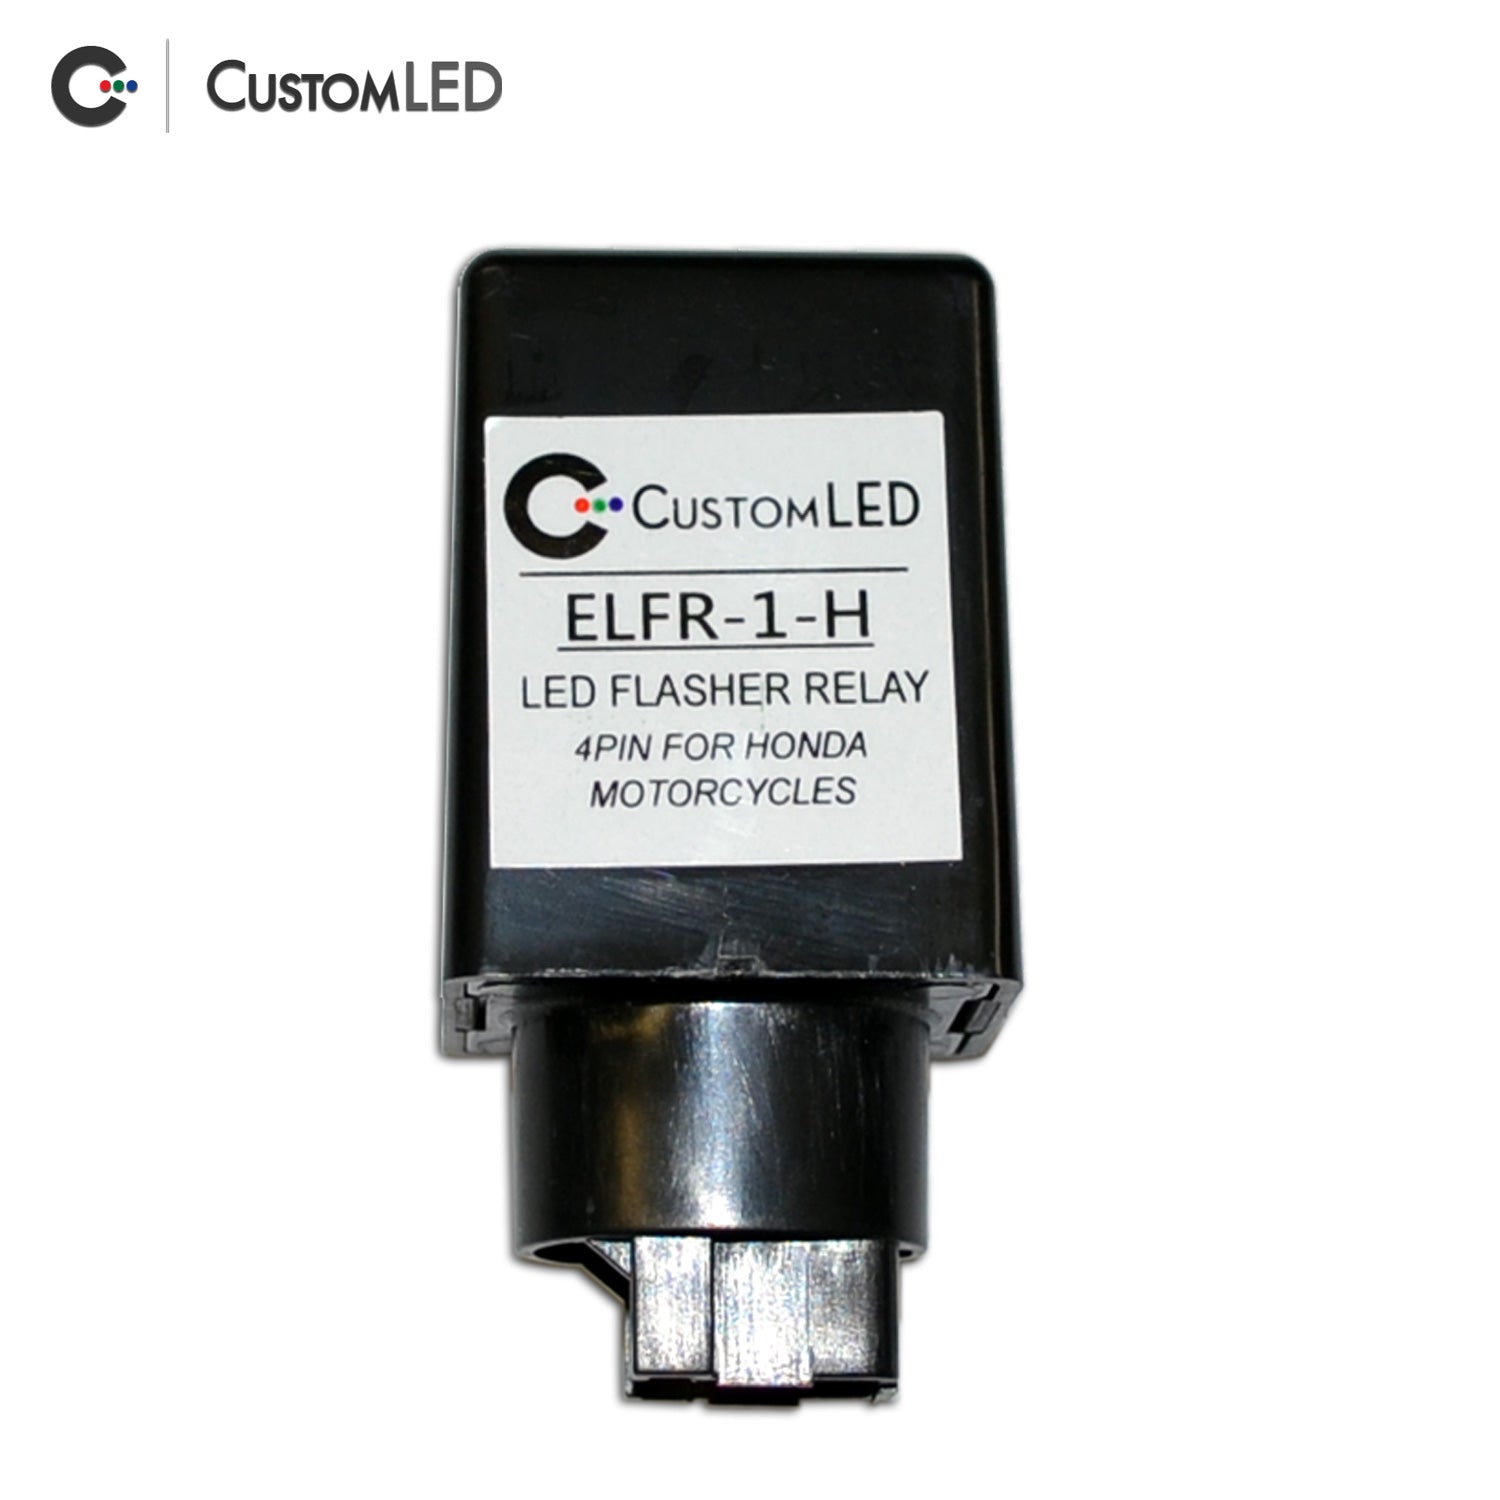
ELFR-1-H is built for compatible Honda motorcycles that use a 4-pin OEM flasher relay connector. It plugs straight into that Honda connector with no adapting.
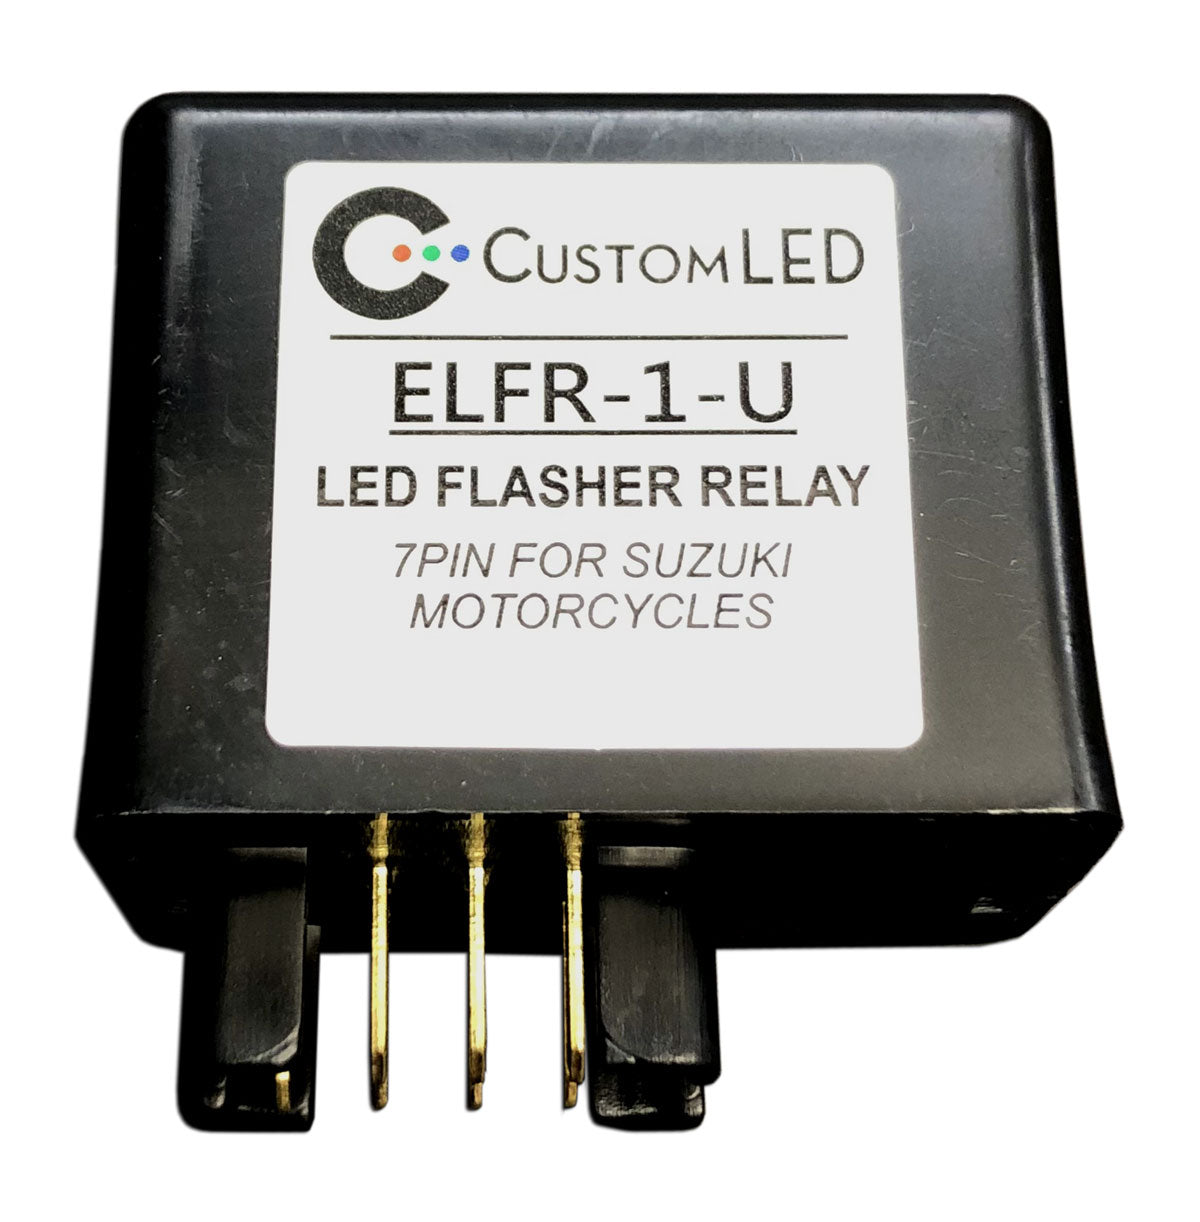
ELFR-1-U is built for compatible Suzuki motorcycles that use a 7-pin OEM combination relay. It maintains all of the functions of that combination relay while restoring a normal blink rate.
ELFR-P is our programmable relay, covered in the next section.
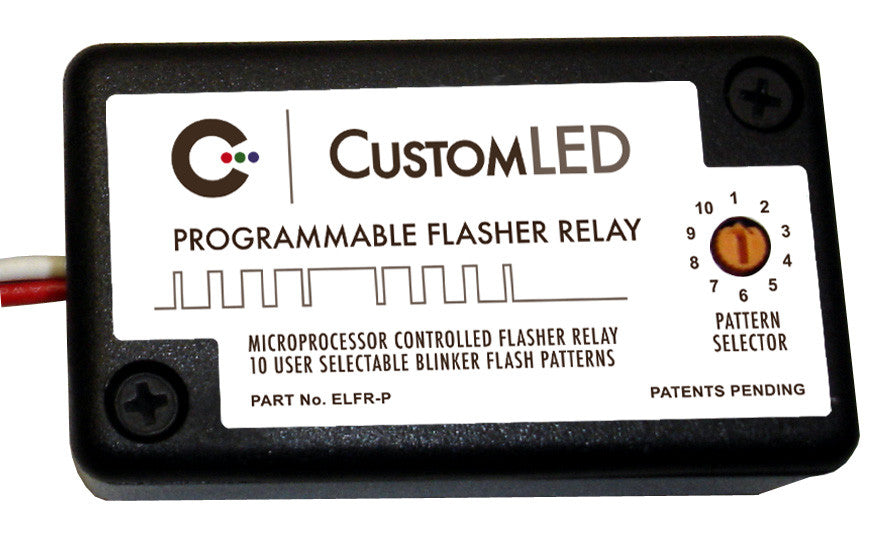
ELFR-P: when you want to choose the flash pattern
The ELFR-P is for riders who want more than a standard hyperflash fix. It is a microcontroller-based relay with 10 user-selectable flash patterns, set with a 10-position rotary switch on the unit. The patterns range from a normal, DOT-style steady flash to attention-grabbing strobe modulations, so you can dial in the look you want and change it later without rewiring.
The easiest way to choose a pattern is to watch them in action. The demonstration below runs through all 10 settings on the rotary switch, from the standard DOT-style flash to the most aggressive strobe, so you can decide which one you want before you install.
The ELFR-P shares the same motorcycle compatibility as the ELFR-1, so if the finder shows that an ELFR-1 fits your bike, you can use the ELFR-P as the programmable alternative. It comes with a longer fused harness and needs one extra connection: a separate ground wire to the frame or battery negative. If all you need is to correct a fast blink and you do not care about selectable patterns, the standard ELFR-1 is the simpler choice.
Problems that look like a relay issue but are not
A flasher relay sets the blink rate, so a few common LED conversion problems get blamed on it by mistake even though it cannot cause or cure them. Knowing the difference saves you from buying the wrong part.
Hyperflash on one side only. A relay affects both sides equally. If just one side flashes fast or behaves oddly, the cause is usually a dead or incompatible bulb, or a bad connection on that side, not the relay.
All signals blinking at once (the 4-way blink). When every signal flashes together like a hazard light regardless of which way you signal, that is the 4-way blink problem, and a flasher relay cannot cause or cure it. It comes from the loss of resistive load and a crossover at the dashboard indicator lamp. The proper fix is to diode-isolate the indicator circuit, or to add load equalizers. Our full walkthrough is in the 4-way blink guide.
A bulb-out or warning light on the dash. Some newer bikes actively monitor the signal circuit and will flag a fault even when the signals work correctly. That is a separate system from the blink rate, and a flasher relay does not address it.
Installing your relay
On a supported bike, installation takes minutes. The factory flasher relay is a small module plugged into the wiring harness. It commonly lives under the seat, behind a side panel or fairing, or near the steering head, but the location varies quite a bit from bike to bike. Your motorcycle's factory repair or service manual is the definitive source for where the flasher relay sits and how to reach it, so check it first if you are not sure. Once you find it, unplug the OEM relay, plug in the matching Custom LED relay, and you are done.
For a hard-wire install, the wiring is straightforward. The red wire goes to switched +12V power (hot with the ignition on), and the black wire goes to the load, meaning the blinker circuit. Leave any factory ground wire unconnected, since our standard relay does not use one. The ELFR-P is the exception: it has a white load wire and needs its own ground wire run to the frame or battery negative.
Mount the relay away from direct engine heat and secure it so it cannot rattle loose from vibration. Your bike needs a standard rectified 12VDC electrical system, which covers almost every modern motorcycle.
Find the right relay for your bike
The finder matches your motorcycle to the correct Custom LED relay and shows OEM relay part numbers and fitment notes where we have them. It is the fastest way to be sure you are ordering the right model before you buy.
Still not sure?
If the finder does not list your motorcycle, or you are not sure which part you need, send us a message with your make, model and year, along with a photo of your OEM flasher relay connector. We will point you to the right solution.